Showing posts with label False lashes. Show all posts

Tuesday, 9 February 2016

Valentune's Day Makeup Look


So every Tuesday I'm going to do a step by step makeup look over on Snapchat (lipstickglitz) is my Snapchat.

To start it all off this week I've done a Valentine's Day inspired look, here is the look I created

 
Before you do your makeup you should always have a good skincare regime and make sure your skin in nice and clean and prepped.
I cleansed the skin with this amazing Organic Surge Hot Cloth Cleanser

Then I applied this moisturiser to my face.... Aveeno Moisturising Lotion and allowed to set for 5/10 mins before moving onto the next step


Then I sprayed my face with Urban Decay B6 prep spray.. this reduces any redness and closed pores. I love this!!


Then I primed my eyes with COVER FX eye soothing primer over the entire lid and under the eye


Once the skin is prepped I then moved onto the brows. I always do my brows before I do anything else with makeup.

 
I used Inglot's Brow Gel in no.15 and the 17TL brush

 Then for the eyes I used
Inglot 335 shadow for transition colour

Catrice Lilac Maniac into the crease

Inglot 450 to warm up the crease using a Inglot 6SS brush
 

        Then when everything was applied and blended I went back over everything again with a clean 6SS brush. This was to insure all lines and colours where blended nice and looking clean


Then to warm everything up and give it that smokey look I used
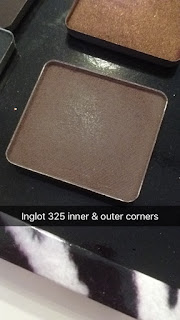
Inglot 325 applied to the inner and outer corners of the eye


I applied 1985 from the Urban Decay Vice Palette onto the centre of the lid

and Inglot Sparkle Dust in the shade 111 pressed on top

using the Inglot 9S brush
 
 
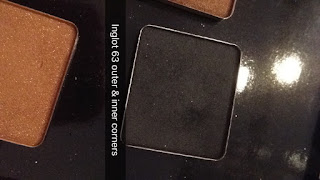
 Then applied Inglot 63 to the outer and inner corners
and Inglot 450 back over it and blended out into crease

Using the Blank Canvas Cosmetics E42 brush
 
 
After that I then moved onto the face and come back to the eyes after I have set and baking the foundation
To start I primed the face using NYX Pore Filler and applied all over face
 
Then I use Cover FX foundation in the shade P30
 
using the Blank Canvas Cosmetics F21 brush in circular and patting motions all over face
 
After that I highlighted under the eyes, bridge of the nose, cupids bow and centre of the forehead using Cover FX Cream Concealer in the shade Light
 
 
and blended all of highlight in using a Sephora Beauty Blender
 
 
Once the highlight was blended I then used the "baking" method to set highlight using Laura Mercier translucent powder and the beauty blender


here is how "baking" looks


While the baking is taking place I went back in and done the winged liner and blended shadow into the lower lash line
For the winged liner I used Inglot Gel Liner in shade 77 with a drop of Duraline to intensify the black, applying it with a 31TL brush from Inglot also

Once liner was done I blended the transition colour 355 from Inglot into the lower lash line

and Inglot 450 on top of transition to intensify and even things out using a Sephora small shadow brush
 
When the eyes where done I brushed off the excess powder from the "baking" and contoured the face using the NYX Contour and Highlighting powder palette and a small NYX Contour brush 

This was the shade I used to contour... it was the second one on the right
and applied to the cheek bones, temples, jaw line and around forehead
 
 
Then I contoured the nose using a Inglot 4SS brush and the same shade of contour
 
 
To blend out the contour I always use this Inglot deep blush shade its that old the number has worn away but I blend it over the contour and up above this slims down the face :)
 Using the Blank Canvas Cosmetics F14 brush
 Then I applied Mac Peaches & Cream to the apples of the cheeks using the same brush
Then to highlight I use Becca Cosmetics Champagne Pop and a Blank Canvas Cosmetics F15 brush and applied it just above cheek bones and above brow
 
 
Once the face is done I applied false lashes. These are Penny/Primark Sultry Lashes
I applied the lashes using Duo Latex Free Glue


Then for the lips I used a lip liner and liquid lipstick
Lip liner is Penny/Primark PS Love range in Plum and L.A Splash liquid lipstick


Here is a small video of the finished look


Let me know what you think of the look... would you wear it?


Rebecca xxx


Wednesday, 9 September 2015

Wednesday's How To Guide - Applying Individual false lashes.

False lashes can be tricky at the best if times but when it comes to applying them on yourself it can be even harder especially the individual ones!! So this week I'm going to show you how to apply them.
It doesn't matter what type you use they are all applied in the same way. Durability all comes down to the glue you use and if they get wet or not.... So when wearing falsies avoid the tears ladies!!!

What I'm using to show you how to apply the individual lashes is...
Penny's / Primark Lashes €1.50
                                              
Duo Glue & Tweezers
Duo Glue can be purchased from Boot's, Mac, Inglot.


How To Apply:
Place a small amount of glue (pea sized) on the back of your hand or on some tinfoil. Taking a piece of the lashes from the box with the tweezers and gently dab the root of the lashes into the glue on the back of your hand. Starting at the inner corner first. This makes it easier starting here instead of the outer corners because if you start at the outside and work your way in the last bud of lashes might be too long and irritate your eye at the end. Apply the lashes as close to the root of you're own lashes. Making sure not to bring them too close to the inner corners so it doesn't irritate you. Look down with the eye you are applying them too and with you're other eye you can judge how close to get to the root of the lashes.


Once You have applied the first lash you then place the next lash right next to the end of the previous lash, always making sure to apply glue to the lashes first.


As the glue becomes tacky and more secure you can then lightly push the lashes upwards while your eye is open to make them curl up more. Keep applying them one after another right beside where each lash ends. If you don't you will create gaps in the lashes and they won't look as full.


Keep applying them until you reach the end of you're own lash line. Don't worry if the last lash comes off the end of your lash line too much this will give the illusion of a longer lash line (don't get carried away tho and start ticking more on)


         Once you have applied them to the complete lash line they will look like this. You can build them up again with another layer over these by doing the exact same application. This will give them an even fuller, thicker look. When they where all applied I gently pushed them up a little into place so they are all in line with my eye open in the mirror.

 
These lashes will last a couple of days once they are looked after and have not got wet. Water will only break down the glue and destroy the shape of the lashes. You can also use the glue that comes with the pack of lashes it just isn't as strong as Duo Glue but its your own personal preference as to what glue you use :)
If you are applying them for a night out I would suggest to doing all of your eye makeup first and then applying the lashes so as its not effecting how you apply your makeup when they are on.
 
You can also re use and lashes when you take them off just make sure you remove the glue from the bud or band of the lashes before applying more.
 
 
I hope this helps anyone next time they go to apply individual false lashes and as always if you have any questions just ask :)


Rebecca xxx :)


Monday, 24 August 2015

Mondays Beauty Bargain Of The Week - Penny/Primark Sultry Lashes

What girl doesn't Love a good set of false lashes that Won't irritate the life out of you once their applied??
Well I've got the answer and they are only €1.50 !!! YES €1.50 With them being that price I had to make them a Bargain Or The Week feature.

I've used these lashes since Pennys brought them out which is a couple of years now. They are nice and soft and the band is nice and flexible so they are super easy to apply. They come with an athesive which will do the job but I apply mine with Duo Glue which can be picked up at any Boots store, Mac Cosmetics and Inglot Cosmetics.
The lashes can be re used once you don't get them wet just gently remove the glue from the band and they are good to use again :)
I always apply a layer of mascara to the top lashes and then apply the flase lashes this will help blend both false and natural lashes together. You can lightly apply mascara to the tips of the false lashes if you want to darken them up a bit more.

I cannot get enough of these falseies and they are a must have for anyone who wants to wear false lashes without them looking to heavy, full or heavy. 
These can be worn during the day for a day look and also for a night time going out look.
Make sure you stock up when you're in Penny's because when they get re stocked they sell out very quick!!

*What I would suggest that you do is bend the lash in to a C curve shape by pinching either end of the band and slightly bend it back and forward, thus will make the lashes shape better to your lash line when applying them.
Measure the lashes up to you're eyes and placing the smaller end to the inside of you're eye, running it along your lash line if there is any if the lashes coming over the end of you're eye this how much you need to trim off the lashes.
Always trim the lash from the smaller/shorter end.

**Apply a thin layer of glue to the band of the lashes and allow to dry to a tacky consistency and place them as close to the root of the lashes as possible and press you're finger or tweezers on the inner and other corners of the eye.

Let me know if you have tried them or plan on getting them :)

Rebecca xxx